
Configure MyPC Cloud to Use Multi‑Factor Authentication (MFA)
MyPC Cloud supports Multi‑Factor Authentication (MFA) to provide an additional layer of security for users who sign in with MyPC Cloud credentials (email and password). Enabling MFA helps protect accounts by requiring a second form of verification during login.
How to Enable Multi‑Factor Authentication
- Log in as the Owner/SuperAdmin.
- Navigate to Admin → Organisation → Advanced Options.
- Locate and enable the Multi‑Factor Authentication option.
- Select Update to save the changes.
Important Notes
- MFA is applied organisation‑wide and affects all users who sign in using MyPC Cloud local accounts.
- This setting does not apply to MyPC Guest Tickets or Library Login accounts.
- If your organisation uses Entra ID (formerly Azure AD), MFA is managed through your Entra configuration and not through MyPC Cloud settings.
Supported MFA Methods
MyPC Cloud’s MFA feature is designed to work with common authenticator apps, including:
- Microsoft Authenticator
- Duo Mobile
- Google Authenticator
As a fallback, users may receive a verification code via email. However, this is a temporary method and will not be remembered. Users will be prompted each time unless they set up an authenticator app.
Using an Authenticator App for MFA
Once your organisation has enabled MFA, users will be prompted to configure it at their next login.
Step 1: Log in to MyPC Cloud
Sign in using your MyPC Cloud username and password.
After logging in, you will be prompted to choose your preferred verification method.
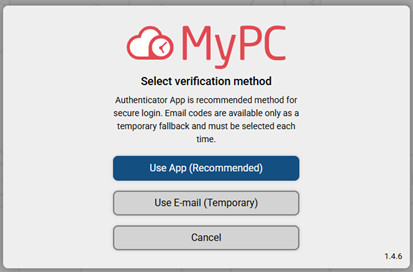
Step 2: Choose Use App (Recommended)
Select Use App (Recommended).
This will send a secure email containing a setup link to help configure your chosen authenticator app.
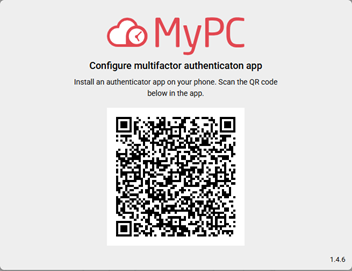
Step 3: Check Your Email
Look for an email with the subject:
MyPC: Action Required – Authenticator App Setup or Reconfiguration
Follow the instructions in the email to generate your unique QR code.
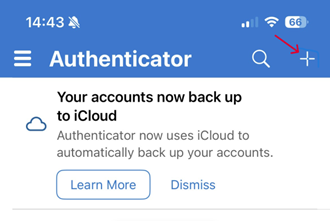
Step 4: Install an Authenticator App
Install an authenticator app of your choice (e.g., Microsoft Authenticator, Duo Mobile, Google Authenticator).
The example below uses Microsoft Authenticator.
Step 5: Add MyPC Cloud to Your Authenticator App
- Open the authenticator app.
- Tap the + icon to add a new account.
3. Choose Other (Google, Facebook, etc.) – this option allows you to scan a QR code.
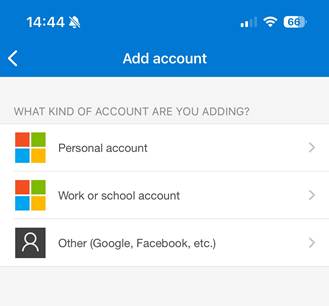
4. When prompted, scan the QR code generated from the email link.
Your authenticator app will automatically add MyPC Cloud as a new account.
Step 6: Use the One‑Time Password (OTP)
Your authenticator app will now generate a rotating One‑Time Password (OTP).
Use this code whenever prompted to verify your identity when logging in to MyPC Cloud.
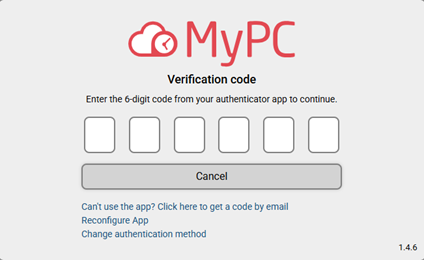
Logging in to MyPC Cloud with Multi‑Factor Authentication Enabled
When Multi‑Factor Authentication (MFA) is enabled, you will be prompted to enter a One‑Time Password (OTP) from your authenticator app each time you log in to MyPC Cloud.
After entering your OTP, you will be logged into the MyPC Cloud web interface as normal.
Important Notes
- If you don’t have access to your authenticator app
For example, if your authenticator app on your phone is unavailable or not working, you can select the option to receive a verification code by email. This allows you to complete login temporarily. - If you get a new device
Installing your authenticator app on a new phone means it will no longer contain your MyPC Cloud MFA configuration.
Simply choose the Reconfigure App option during login to set up your authenticator app agai